Workshop Projects - DIY Strip Sander
The core thing that interests me through the various things that I do is making, it could be a website an electronics project or even a table it doesn't really matter. I find the act of achieving something and having something to show for my effort very satisfying. Lately I have been spending a lot of time in the workshop so I have decided to document a few of the things I have made.
One of the things I quite like to make are tools and over the last few weeks I have been slowly building a strip sander, I made a really usefull disk sander last year so this seemed like a good challenge.
I got the idea from Matthias Wandel's project although I deviated form his design in a couple of places.
Drive wheels
As a starting point I bought two skate wheels and proceeded to sand these down to a flat surface, these along with a larger drive wheel would form the 3 running wheels for the belt. I also got myself a sanding belt although I had difficulty finding one long enough, I settled for something a bit shorter than I would have liked.
The drive wheel is a plywood disk with a 6mm shaft secured in it, I sanded this down to a good finish by placing it in the drill stand and running it with the sandpaper wrapped around it.
The Frame
With the 3 wheels made I cut out the rough template that would accommodate the belt size and started to mount the wheels in it. For the drive wheel I mounted a skate bearing and epoxied this in place while the wheels had integral bearings and could be mounted on a simple shaft.
Belt tracking
One of the clever parts of Matthias's design was the ability to alter the tracking for the belt, he achieved this by tilting the bottom front wheel to keep the belt on track. I copied most of his design but simplified the adjustment section a bit through the use of a spring.
The triangular piece will tilt the shaft along the range of the slot in the wood, by moving it forward and backward you can control the tracking. I epoxied a nut into the wood and used a spring to keep the piece of wood in the right place without the need for a rear mounting point. I also glued some wood alongside to act as a guide to ensure it didn't move around.
Tensioning and belt removal
With the bottom two wheels in place it was time to tackle the top wheel, this was another static wheel but its position needed to be adjustable to maintain the right tension and to be able to relax it so the belt can be removed.
Matthias had used a nut that could be driven down to control the position but as with the tracking I decided on a spring to simplify things. I wasn't sure how tensioned the spring needed to be so I epoxied a couple of bent nails into the wood to allow the tension to be controlled.
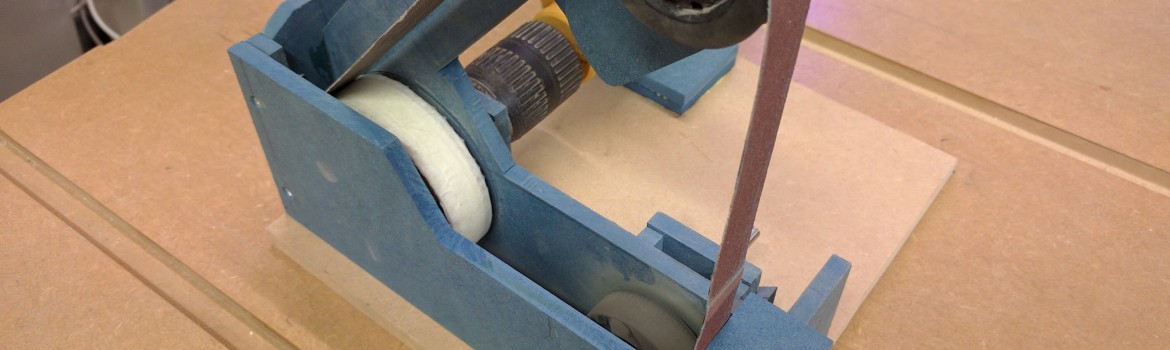
Finished!
I finished it off by adding a support for the drill which will be removed when not in use and adding a cover for the side to keep in the dust.
Most of this is glued together which is in part why it took a while to build, I would try out one piece and leave it to dry until I could get over to the workshop again. I am not sure how this will hold up to use but with the thin mdf I am using I didn't have too many options.
Is it any good?
The short answer is yes!
This is a surprisingly useful tool, it doesn't have a permanent home like the disk sander but it's easy enough to get out and attach the old drill to so I have ended up using it quite a few times. The tensioning isn't as strong as I would have liked so you can't apply too much force but this doesn't seem to affect its use much, in addition the belt does wander a bit and rubs quite badly against the wood in places but overall I am very pleased.